Vivasoft-logo

3.8. Event capturing এবং bubbling এর পার্থক্য

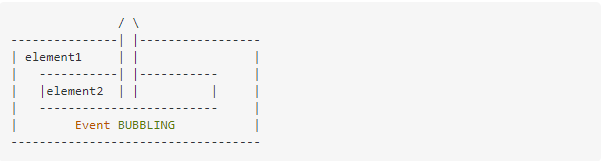
DOM ইভেন্টগুলি ইভেন্ট প্রোপাগেশন 3টি পর্যায় বর্ণনা করে: ক্যাপচারিং ফেজ – ইভেন্টটি এলিমেন্ট চলে যায়। টার্গেট ফেজ – ইভেন্ট টার্গেট এলিমেন্টে পৌঁছেছে। বাবলিং পর্যায় – ঘটনাটি এলিমেন্ট থেকে উঠে। Bubbling and Capturing 3.8. Event capturing এবং bubbling এর পার্থক্য 
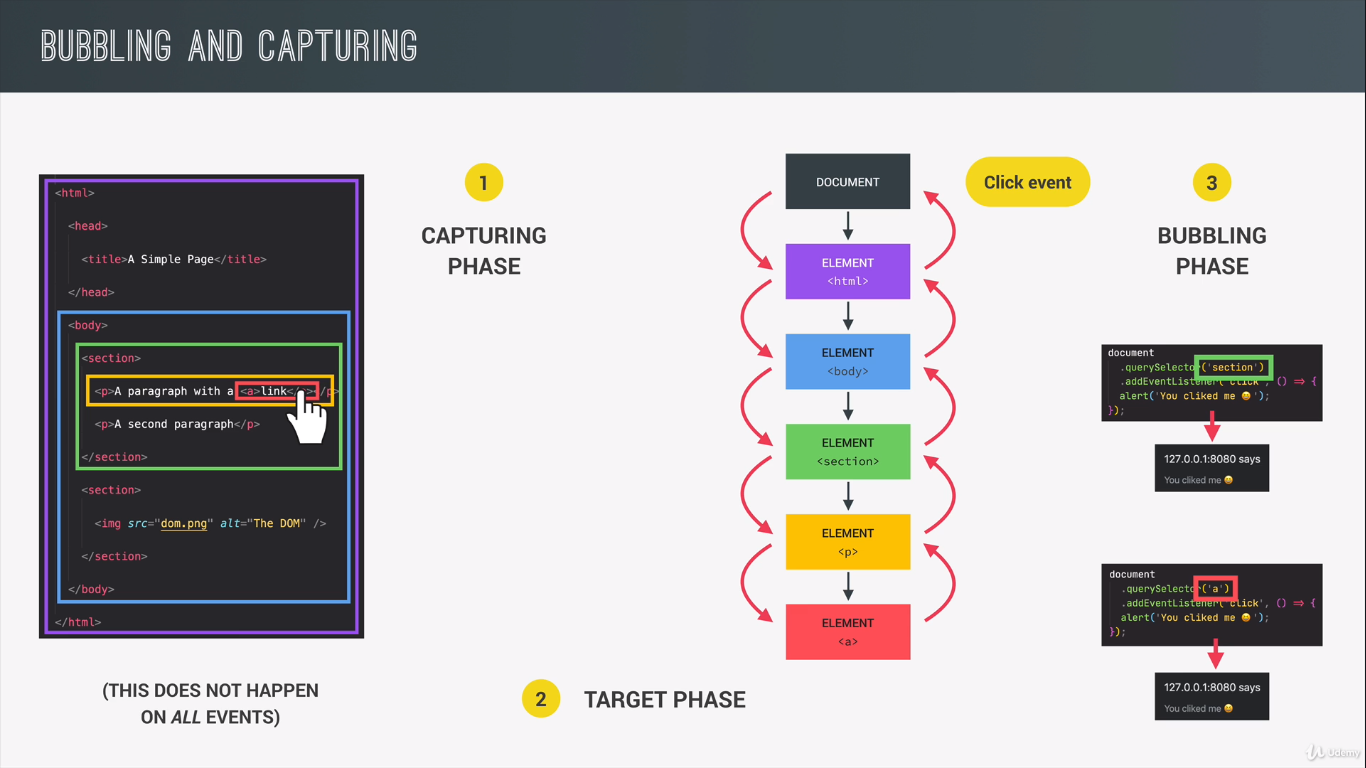
ইভেন্ট বাবলিং হলো ইভেন্ট-এর প্রোপাগেশন যেটা এর অরিজিন থেকে উপরে রুট ইলিমেন্ট পর্যন্ত গিয়ে থামে। অর্থাং যখনি কোনো একজন ইউজার পেজের কোনো একটা বাটনে ক্লিক করে তথন সেই বাটনের আন্ডারে যে ইভেন্ট হ্যান্ডেলার টা আছে সেই ইভেন্ট টা তার প্যারেন্ট, তার প্যারেন্ট, আবার তার প্যারেন্ট এভাবে সে রুট ইলিমেন্ট Html পর্যন্ত ইভেন্ট-এর প্রোপাগেশন বা প্রচার চালায় । ইভেন্ট টি তার উপরের সব ইলিমেন্ট কে জানিয়ে দেয় যে, কেউ একজন তাকে ক্লিক করেছে।

bubbling 3.8. Event capturing এবং bubbling এর পার্থক্য

আপনি চাইলে বাবলিং টাকে রোধ করতে পারেন, জাস্ট stopPropagation মেথড ব্যবহার করে।
document.querySelector(‘#signin’).addEventListener(‘click’, (e) => {
e.stopPropagation();
console.log(‘Sign in button click’);
});
ইভেন্ট ক্যাপচারিং হলো ইভেন্ট-এর প্রোপাগেশন যেটা এর রুট ইলিমেন্ট থেকে টার্গেট এলিমেন্ট পর্যন্ত গিয়ে থামে। capturing 3.8. Event capturing এবং bubbling এর পার্থক্য
  • We already know the basics of event capturing and bubbling.


    <!DOCTYPE html>
    <html lang=“en”>
    <head>
    <meta charset=“UTF-8”>
    <meta http-equiv=“X-UA-Compatible” content=“IE=edge”>
    <meta name=“viewport” content=“width=device-width, initial-scale=1.0”>
    <title>Event Bubbling and Capturing</title>
    <!– Some css to identify the divs easily –>
    <style>
    div {
    border: 1px solid black;
    }
    #grandparent {
    background-color: green;
    width: 300px;
    height: 300px;
    }
    #parent {
    background-color: blue;
    width: 200px;
    height: 200px;
    }
    #child {
    background-color: red;
    width: 100px;
    height: 100px;
    }
    </style>
    </head>
    <body>
    <div id=“grandparent”>
    Grandparent
    <div id=“parent”>
    Parent
    <div id=“child”>
    Child
    </div>
    </div>
    </div>
    </body>
    </html>
     
    In this example, we will dive a little deeper. The third argument of ‘addEventListener’ function tell whether the event will be in the capture phase or in the bubbling phase. By default it is in bubbling phase (if we provide no parameter)


    const grandparent = document.getElementById(“grandparent”) const parent = document.getElementById(“parent”) const child = document.getElementById(“child”) // bubbling grandparent.addEventListener(“click”, ()=> { console.log(“Grandparent clicked”); }, false) // capturing or trickling parent.addEventListener(“click”, ()=> { console.log(“Parent clicked”); }, true) // bubbling child.addEventListener(“click”, ()=> { console.log(“Child clicked”); }, false)


    Run the code. now click on the child div. We can see that the output will be.
    Output:
    Parent clicked
    Child clicked
    Grandparent clicked
    We can stop event capturing and bubbling if we want.
    We can use a parameter “e” in the callback function of
    addEventListener function. It is an event object
    which has a function called stopPropagation() which helps
    to stop event capturing and bubbling.


    <!DOCTYPE html>
    <html lang=“en”>
    <head>
    <meta charset=“UTF-8”>
    <meta http-equiv=“X-UA-Compatible” content=“IE=edge”>
    <meta name=“viewport” content=“width=device-width, initial-scale=1.0”>
    <title>How to stop Event Capturing and Bubbling</title>
    <!– Some css to identify the divs easily —>
    <style>
    div {
    border: 1px solid black;
    }
    #grandparent {
    background-color: green;
    width: 300px;
    height: 300px;
    }
    #parent {
    background-color: blue;
    width: 200px;
    height: 200px;
    }
    #child {
    background-color: red;
    width: 100px;
    height: 100px;
    }
    </style>
    </head>
    <body>
    <div id=“grandparent”>
    Grandparent
    <div id=“parent”>
    Parent
    <div id=“child”>
    Child
    </div>
    </div>
    </div>
    </body>
    </html>


    const grandparent = document.getElementById(“grandparent”)
    const parent = document.getElementById(“parent”)
    const child = document.getElementById(“child”)
    // bubbling
    grandparent.addEventListener(“click”, (e)=> {
    console.log(“Grandparent clicked”);
    })
    // bubbling
    parent.addEventListener(“click”, (e)=> {
    console.log(“Parent clicked”);
    e.stopPropagation()
    })
    // bubbling
    child.addEventListener(“click”, (e)=> {
    console.log(“Child clicked”);
    })
     
    Output:
    Child clicked
    Parent clicked

    ইফেক্ট বুঝতে হলে প্রথমে এই HTML ফাইলটি আপনার ব্রাউজারে ওপেন করে মাউসের রাইট বাটন ক্লিক করে Inspect এ ক্লিক করুন। অতঃপর Console ট্যাবে ক্লিক করুন। এখন Event Bubbling ও Event Capturing কিভাবে হচ্ছে সেটা বুঝতে বক্সগুলোতে ক্লিক করে দেখুন।


    <!DOCTYPE html>
    <html lang=“en”>
    <head>
    <meta charset=“UTF-8”>
    <meta http-equiv=“X-UA-Compatible” content=“IE=edge”>
    <meta name=“viewport” content=“width=device-width, initial-scale=1.0”>
    <title>Event Bubbling and Capturing</title>
     
    <!– CSS Style for Better Visualization —>
    <style>
    body {
    height: 100vh;
    }
    h2 { text-align: center; }
    .mid {
    display: flex;
    justify-content: space-around;
    align-items: center;
    cursor: pointer;
    }
    .hw300 {
    height: 300px;
    width: 300px;
    }
    .hw200 {
    height: 200px;
    width: 200px;
    }
    .hw100 {
    height: 100px;
    width: 100px;
    }
    #red { background-color: red; }
    #green { background-color: green; }
    #skyblue { background-color: skyblue; }
    #blue { background-color: blue; }
    #purple { background-color: purple; }
    #gold { background-color: goldenrod; }
    </style>
    </head>
    <body class=“mid” style=“cursor: auto;”>
    <!– Event Bubbling Section —>
    <h2>
    Event Bubbling
    <div id=“red” class=“mid hw300”>
    <div id=“green” class=“mid hw200”>
    <div id=“skyblue” class=“mid hw100”>
    Click Me
    </div>
    </div>
    </div>
    </h2>
    <!– Event Capturing Section —>
    <h2>
    Event Capturing
    <div id=“blue” class=“mid hw300”>
    <div id=“purple” class=“mid hw200”>
    <div id=“gold” class=“mid hw100”>
    Click Me
    </div>
    </div>
    </div>
    </h2>
    </body>
    </html>


    const redDiv = document.querySelector(‘#red’);
    const greenDiv = document.querySelector(‘#green’);
    const skyblueDiv = document.querySelector(‘#skyblue’);
    const blueDiv = document.querySelector(‘#blue’);
    const purpleDiv = document.querySelector(‘#purple’);
    const goldDiv = document.querySelector(‘#gold’);
     
    // Event Bubbling Phase
    redDiv.addEventListener(‘click’, () => {
    console.log(‘Red box clicked.’);
    }, false)
    greenDiv.addEventListener(‘click’, () => {
    console.log(‘Green box clicked’);
    }, false)
    skyblueDiv.addEventListener(‘click’, () => {
    console.log(‘Skyblue box clicked’);
    }, false)
     
    // Event Capturing Phase
    blueDiv.addEventListener(‘click’, () => {
    console.log(‘Blue box clicked.’);
    }, true)
    purpleDiv.addEventListener(‘click’, () => {
    console.log(‘Purple box clicked’);
    }, true)
    goldDiv.addEventListener(‘click’, () => {
    console.log(‘Golden box clicked’);
    }, true)
     
    addEventListener() ফাংশনের তৃতীয় argument হিসেবে আমরা যে true/false ভ্যালু দিয়েছি সেটা বাই ডিফল্ট false থাকে অর্থাৎ nested element ক্লিক করার ক্ষেত্রে সেটা বাই ডিফল্ট event bubbling করে থাকে। বিষয়টি যদি অন্যভাবে বলি তাহলে বলা যায় যে তৃতীয় আর্গুমেন্টে জিজ্ঞাসা করা থাকে এই event টি প্রথমে capture করা হবে নাকি হবে না।
1. What is event bubbling and capturing?
2. What is event bubbling for?
3. What is event propagation in DOM?
4. Why do we use event bubbling?
5. How can you stop the event bubbling up?