Vivasoft-logo

3.9. Events Delegation এবং Propagation

ইভেন্ট delegation ইভেন্ট propagation পদ্ধতি ব্যবহার করে। ইভেন্ট delegation কীভাবে কাজ করে তা বোঝার জন্য, আমাদেরকে প্রথমে ইভেন্ট propagation বুঝতে হবে।

Event propagation

আপনি যখন নিম্নলিখিত HTML এর button টি ক্লিক করেনঃ
<html>
<body>
<div id=“buttons”>
<button class=“buttonClass”>Click me</button>
</div>
</body>
</html>
একটি ক্লিক ইভেন্ট কতগুলি element এ ট্রিগার হয়? button টি নিজেই একটি ক্লিক ইভেন্ট পায়। কিন্তু এছাড়াও ঐ button এর সকল ancestors এবং এমনকি document ও window অবজেক্ট ক্লিক ইভেন্ট পায়। একটি ক্লিক ইভেন্ট 3টি পর্যায়ে প্রচারিত হয়:
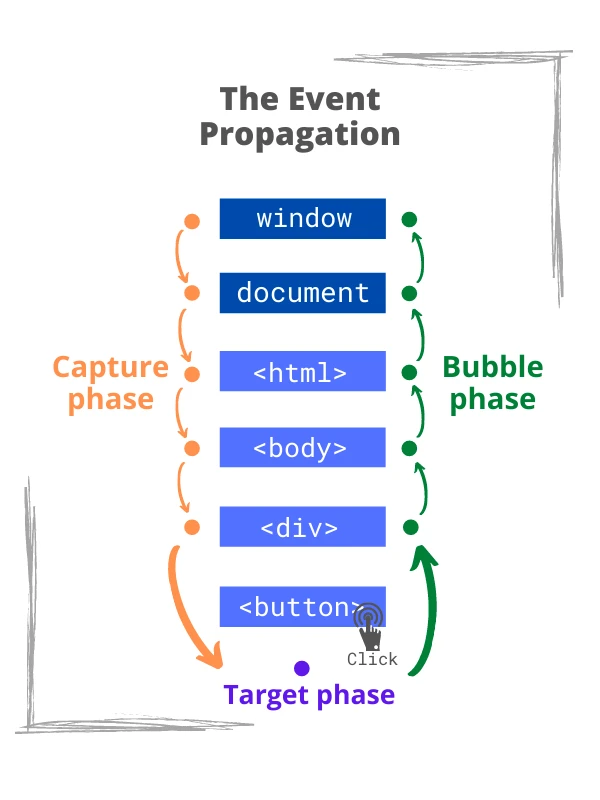
  1.  Capture phase — window, document এবং root element থেকে শুরু করে ইভেন্ট টার্গেট এলিমেন্টের ancestor মধ্য দিয়ে নিচে নেমে যায়।
  2.  Target phase — ব্যবহারকারী যে element টিতে ক্লিক করেছেন তাতে ইভেন্টটি ট্রিগার হয়।
  3.  Bubble phase — অবশেষে, root element, document এবং window পর্যন্ত target element এর ancestor এর মাধ্যমে event টি bubble up হয়ে যায়।
Event deligation and propagation 3.9. Events Delegation এবং Propagation নিম্নলিখিত ইভেন্ট হ্যান্ডলার element এ সংঘটিত ক্যাপচার পর্বে ক্লিক ইভেন্টের জন্য শোনে
document.body.addEventListener(‘click’, () => {
console.log(‘Body click event in capture phase’);
}, true);
নিচের method এর তৃতীয় আর্গুমেন্ট হল captureOrOptions আপনাকে বিভিন্ন পর্যায় থেকে ইভেন্টগুলি ধরতে দেয়:
element.addEventListener(eventType, handler, [captureOrOptions]);
  • যদি captureOrOptions argument টি missing, false বা { capture: false } হয়, তাহলে listener target এবং bubble phase এর event গুলি ক্যাপচার করে
  • যদি argument টি true হয় বা { capture: true } হয়, তাহলে listener ক্যাপচার পর্বের ঘটনাগুলি শোনে।
তাহলে, কিভাবে ইভেন্ট propagation একাধিক button এর event ক্যাপচার করতে সাহায্য করে? অ্যালগরিদম টি সহজ: ইভেন্ট লিসেনারকে button এর parent এর সাথে সংযুক্ত করুন, এবং একটি button ক্লিক করা হলে bubble ইভেন্ট ধরতে হবে। ঠিক এভাবেই ইভেন্ট delegation কাজ করে।

Event delegation

আসুন একাধিক button এ ক্লিকগুলি ধরতে ইভেন্ট delegation ব্যবহার করি:
<div id=“buttons”>
<button class=“buttonClass”>Click me</button>
<!– buttons… —>
<button class=“buttonClass”>Click me</button>
</div>
<script>
document.getElementById(‘buttons’)
.addEventListener(‘click’, event => {
if (event.target.className === ‘buttonClass’) {
console.log(‘Click!’);
}
});
</script>
ইভেন্ট delegation mechanism টি অনেক সহজ. ইভেন্ট listener দের সরাসরি button গুলিতে সংযুক্ত করার পরিবর্তে, আপনি parent listen delegate করেন। যখন একটি এ ক্লিক করা হয়, তখন মূল element টির listener bubble ইভেন্টটি ধরে। ইভেন্ট delegation ব্যবহার করার জন্য  3টি পদক্ষেপ প্রয়োজন: Step 1. ইভেন্টগুলি দেখার জন্য element গুলির parent নির্ধারণ করুন৷ উপরের উদাহরণে, হল button গুলির parent element Step 2. ইভেন্ট listener কে মূল element এর সাথে সংযুক্ত করুন
document.getElementById(‘buttons’).addEventListener(‘click’, handler)
ইভেন্টটি লিসেনারকে button এর parent element এর সাথে সংযুক্ত করে। এই listener button ক্লিকে প্রতিক্রিয়া দেখায় কারণ button ক্লিক ইভেন্ট ancestor এর মাধ্যমে bubble করে event propagation এর কারণে। Step 3. target element নির্বাচন করতে event.target ব্যবহার করুন যখন একটি button ক্লিক করা হয়, হ্যান্ডলার ফাংশন একটি event object argument এর সঙ্গে invoke হয়. event.target.property হল সেই element যার উপর ইভেন্টটি পাঠানো হয়েছে, যা উদাহরণে একটি button.
  • Highlight a cell <td> on click.
table.onclick = function(event) {
let target = event.target; // where was the click?
if (target.tagName != ‘TD’) return; // not on TD? Then we’re not interested
highlight(target); // highlight it
};
function highlight(td) {
if (selectedTd) { // remove the existing highlight if any
selectedTd.classList.remove(‘highlight’);
}
selectedTd = td;
selectedTd.classList.add(‘highlight’); // highlight the new td
}
  • Hide messages with delegation.
<div id=“container”>
<div class=“pane”>
<h3>Horse</h3>
<p>The horse is one of two extant subspecies of Equus ferus. It is an odd-toed ungulate mammal belonging to the taxonomic family Equidae. The horse has evolved over the past 45 to 55 million years from a small multi-toed creature, Eohippus, into the large, single-toed animal of today.</p>
<button class=“remove-button”>[x]</button>
</div>
<div class=“pane”>
<h3>Donkey</h3>
<p>The donkey or ass (Equus africanus asinus) is a domesticated member of the horse family, Equidae. The wild ancestor of the donkey is the African wild ass, E. africanus. The donkey has been used as a working animal for at least 5000 years.</p>
<button class=“remove-button”>[x]</button>
</div>
<div class=“pane”>
<h3>Cat</h3>
<p>The domestic cat (Latin: Felis catus) is a small, typically furry, carnivorous mammal. They are often called house cats when kept as indoor pets or simply cats when there is no need to distinguish them from other felids and felines. Cats are often valued by humans for companionship and for their ability to hunt vermin.
</p>
<button class=“remove-button”>[x]</button>
</div>
</div>
<script>
container.onclick = function(event) {
if (event.target.className != ‘remove-button’) return;
let pane = event.target.closest(‘.pane’);
pane.remove();
};
</script>
  • Tree menu: Create a tree that shows/hides node children on click.
  • Sortable table: Make the table sortable: clicks on <th> elements should sort it by corresponding column.
  • Tooltip behavior: Create JS-code for the tooltip behavior. When a mouse comes over an element with data-tooltip, the tooltip should appear over it, and when it’s gone then hide.